LightBlog

vendredi 1 novembre 2019

How to root the Google Pixel 4 or Pixel 4 XL with Magisk

Android power users in the XDA community still consider root access really important. There are just some things you can only do with root access, like enabling the Pixel 4’s face unlock in any app. If you bought the Pixel 4 or Pixel 4 XL and want to learn how to root it, we’ll show you how in this tutorial. Since TWRP, the most popular custom recovery there is, will take some time to be ported to the latest Pixels, the current rooting method is a bit more involved than what you might be used to. Once stable TWRP is available, we’ll update this article to simplify the steps.

Before we get into how to root your phone, you are going to want to do a few things. First, you will want to back up all the data on your phone. That’s because rooting requires wiping ALL the data on your phone, which includes not only installed apps but also all files saved to the internal storage. You can save your files to your PC, Google Drive, Google Photos, etc., but just make sure it’s easily accessible. You also want to make sure you have about 10GB of available storage on your PC, as you will need storage for downloading the factory images. After you’re done, though, you can delete these files to free up space. Though, it’s a good idea to keep the factory images saved in case you have any problems in your post-root adventure and need to restore to stock.

It is important to note these steps will NOT work on U.S. carrier models of the Pixel 4 and Pixel 4 XL as carriers like to prevent bootloader unlocking, making it impossible to root your phone. Sometimes, though, people find workarounds, and we’ll let you know if any are found.


How to root the Google Pixel 4

Step 1 – Get the Boot Image

Before we can root, we need to get the boot image that matches the current software build you’re running. We will patch this boot image with Magisk Manager. To get the boot image, you need to extract it from the Pixel 4 or Pixel 4 XL factory image, a file that contains ALL the images of your phone needed to make a full restore. To make sure you download the right factory image, you need to check which software version your phone is currently running. To check this, go to Settings > About phone. At the bottom, look for the “Build number.” Find the matching build number on the factory image download page and download that file.

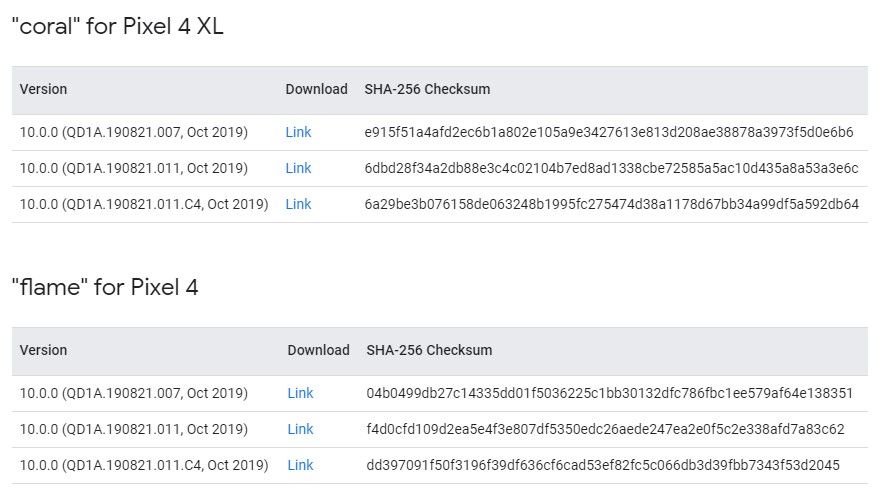
Pixel 4 Factory Images ||| Pixel 4 XL Factory Images

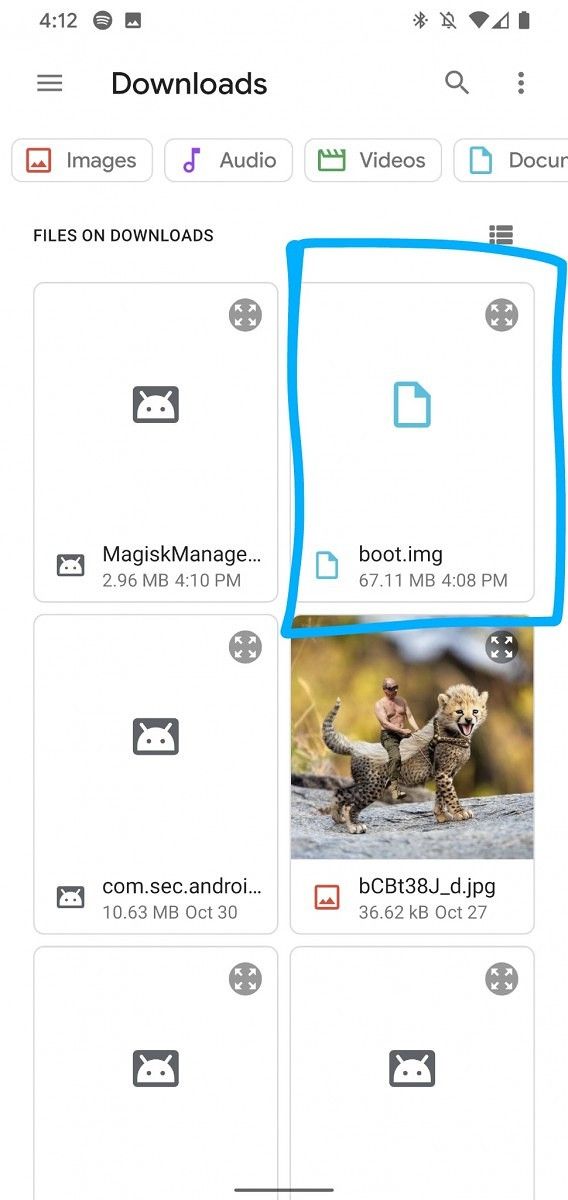
Next, extract the factory image .zip file and then extract the image-devicecodenameversion.zip file (yes, there’s a zip within a zip). Pull the boot.img file from the latter folder. Transfer this boot.img file to your phone. You can either connect your phone to your PC or send it through a file transfer app. It doesn’t really matter how it gets there; it just needs to end up on your phone.

Step 2 – Patch Boot Image in Magisk Manager

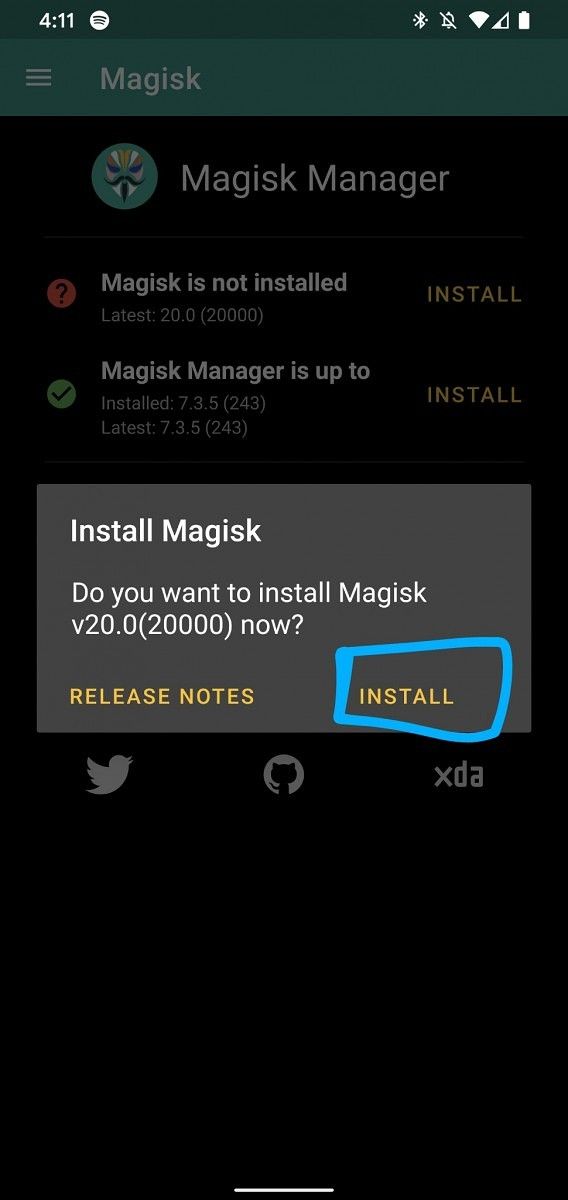
With the boot image file on your phone, you are next going to need to download and install the latest Magisk Manager APK. This is the companion app for Magisk that you will use to patch the boot image. Download the APK linked below and install it.

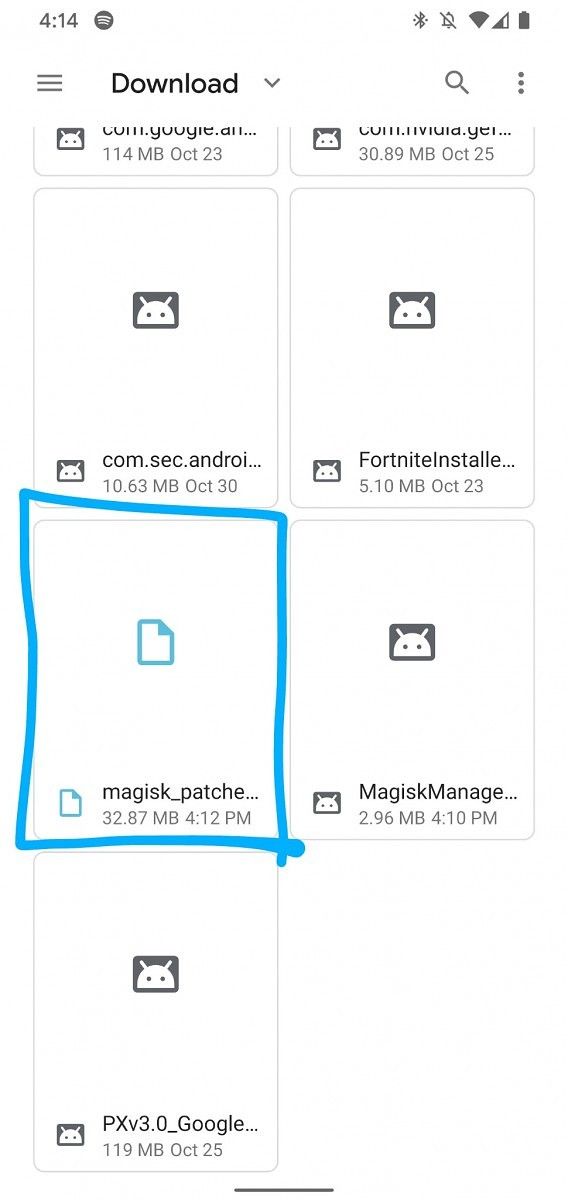
In Magisk Manager, you will need to click “Install” button next to the “Magisk is not installed” text. Select “Install” then “Select and Patch a file.” This will open the Android file manager. Go ahead and find the boot.img you transferred from your PC and select that in Magisk Manager. Magisk will then patch the boot image and save a file called “magisk_patched.img” in your Downloads folder.

You must transfer this file back to your PC, because next, we’re going to unlock the bootloader which will wipe all data as we warned previously.

Download Magisk Manager APK

Note: If you browse the XDA Forums for the Pixel 4 or Pixel 4 XL, you may be lucky enough to find a pre-patched boot image. This will save you the hassle of performing steps 1 & 2, but make sure that any pre-patched boot image you download matches your software build version!

Step 3 – Enable OEM Unlock

First, go to Settings then “About phone.” Look for the “Build number” at the bottom and tap on this entry 7 times until you enable “Developer Options.” It’ll ask you to enter your phone’s password. After enabling Developer Options, go back to the main settings page and select “System,” then select the advanced dropdown at the bottom and go to “Developer Options.” From there, select “OEM unlocking” and enter your password.

Step 4 – Unlock Bootloader

After enabling OEM unlock, turn off your phone. Hold both the volume up and power buttons to turn your phone back on and boot into the bootloader menu. While here, plug your phone into your PC. I’m assuming you have ADB and Fastboot installed already, but if not, you’ll want to install that before continuing. In a command prompt or terminal window, type:

fastboot flashing unlock

You will see a screen telling you that you are about to initiate the bootloader unlocking process. Use the volume button to navigate and the power button to accept. Again, this will wipe all the data on your phone, so make sure you have your data backed up before proceeding.

After unlocking the bootloader, it will boot back up after a few minutes. You can either setup your phone now or wait until after your flash the Magisk-patched boot image. I recommend that you don’t set up your phone just yet.

Step 5 – Flash Magisk-Patched Boot Image

After your boot image is patched and the bootloader is unlocked, you can finally flash the patched boot image to install Magisk (and gain root access). Turn off your phone as at this point it should be at the setup screen. You now want to boot back into the bootloader by holding the volume down and power buttons again. Once you are here, you are one step away from root.

Type

fastboot flash boot path/to/magisk_patched.img

As soon as you hit enter, the patched boot image will be flashed to your phone. As soon as you reboot using “fastboot reboot,” your phone will be rooted with Magisk. The Magisk Manager app should appear on your home screen, but if it doesn’t, just install the APK manually.

This is all it takes to root your Pixel 4 and Pixel 4 XL.

Step 6 – What’s Next?

Do note that you’ll have to repeat steps 1, 2, and 5 every time you update your phone because the boot image changes with each update. Since your phone is now rooted, you won’t be getting OTA updates, though. You’ll instead have to flash the latest update via the latest factory image, but you can do so without wiping any data. This doesn’t apply if you’re running a custom ROM from the forums, though.

If you’re looking for things to do with your newly rooted Pixel 4, check out our forums for ideas:

Pixel 4 Forums ||| Pixel 4 XL Forums

The post How to root the Google Pixel 4 or Pixel 4 XL with Magisk appeared first on xda-developers.


from xda-developers https://ift.tt/2N5hyur
via IFTTT

[Update: New Render & Launch Date] Huawei Nova 6 render reveals dual punch hole display like the Galaxy S10+

Update (11/1/19 @ 2:05 PM ET): New renders of the dual hole punch Huawei Nova 6 have leaked alongside a possible launch date

Following the launch of the iPhone X, most Android manufacturers bought into the trend of adding a notch to the top of the display. However, Samsung came up with a unique solution of its own and came out with a punch-hole display on the Galaxy S10 series. While it wasn’t as trendy as the notch, which you can still find on several devices in different shapes and forms, a couple of manufacturers did implement it on their devices. Huawei, for instance, launched the Honor View 20 and the Huawei Nova 4 with a similar design, but they included a single circular cutout like the one on the Galaxy S10 and Galaxy S10e. Now, leaks suggest that the upcoming Huawei Nova 6 will have a dual pill-shaped punch-hole display featuring two selfie cameras.

Huawei Nova 6 5G Leaked Render

As reported by 91Mobiles, leaked renders of the Huawei Nova 6 5G reveal that the device will feature a pill-shaped cutout in the top left corner of the display, like the one on the Galaxy S10 Plus. This cutout will house two camera modules, giving users more options while clicking selfies. Other than that, the device will feature the usual glass sandwich design that has become commonplace over the last year, with a gradient finish on the back and a nearly bezel-less display up on the front. The device will also include a vertically-aligned triple camera module with a dual-LED flash. The renders also suggest that the device will have laser autofocus or 3D ToF sensor next to the camera module, along with Huawei’s ‘AI Camera’ branding right next to it.

While we have no information on the hardware specifications yet, we know pretty much everything about its design. The Huawei Nova 6 will feature a power button and volume rocker to the right of the device, with no physical fingerprint sensor in sight. This further suggests that the device may have an in-display fingerprint sensor. The device also has black bands on the top and sides, which could be antennas for 5G reception. As of now, there’s no word from the company regarding the internal specifications or the launch date, but we expect to learn more about the Huawei Nova 6 as its launch draws closer.

Source: 91Mobiles


Update: New Render & Launch Date

We now have another look at the Huawei Nova 6 with dual hole-punch cameras on the front. This render is of the 4G model and it shows the phone in three colors: black/silver, blue, and purple. The dual hole-punch is on the left side of the display. More important that the render, however, is a rumored launch date. Apparently, the date shown on the lock screen in the render is the launch date: December 5th.

Source: Android Headlines


Note: The featured image is a Photoshopped version of the Huawei Nova 4.

The post [Update: New Render & Launch Date] Huawei Nova 6 render reveals dual punch hole display like the Galaxy S10+ appeared first on xda-developers.


from xda-developers https://ift.tt/2pmbsga
via IFTTT

URL Radio lets you listen to your favorite online radio stream on Android Auto

Poweramp’s latest update brought over the Powerstream feature, a feature that allowed HTTP streaming for online radios on Android smartphones. But Android smartphones as a whole tend to have a much better app ecosystem and a wider variety of options and alternatives. Radio services are also more popularly accessed during car rides, so having the ability to listen to your favorite online radio stream on Android Auto would be incredible. If you have been looking for an app to do the same on Android Auto, then check out URL Radio.

URL Radio by XDA Senior Member jamal2367 is an app for Android Auto head units that allows you to conveniently listen to your favorite stream via URL links.

URL Radio lets you listen to your favorite online radio stream on Android Auto URL Radio lets you listen to your favorite online radio stream on Android Auto

To access different URL streams, you need to add the .m3u files to Android/data/com.jamal2367.urlradio/files/Collection. The dev has shared a playlist zip file which has a whole bunch of streams, so you can get up and started with little effort. 128kbit/s AAC streams can consume about 60MB per hour, so plan your usage accordingly. The app also features light and dark themes, so you can choose the theme that is best suited to your preference.

Check out URL Radio in the XDA Forums!

The post URL Radio lets you listen to your favorite online radio stream on Android Auto appeared first on xda-developers.


from xda-developers https://ift.tt/36rCseH
via IFTTT

Google officially acquires Fitbit for $2.1 billion

As was widely rumored earlier this week, Google is buying Fitbit. The company officially announced the acquisition on its blog this morning. The deal puts Fitbit under Google, not Alphabet, similar to how Nest is now organized. Google reportedly spent $2.1 billion on the fitness company.

People will immediately assume that this move is to bolster Wear OS, and it does seem like that’s the goal. Google SVP of devices and services Rick Osterloh said that the purchase is “an opportunity to invest even more in Wear OS as well as introduce Made by Google wearable devices into the market.” Google’s own fitness software is decent, but clearly behind Fitbit and Apple.

On the hardware side of things, Google has never released a smartwatch under the “Made by Google” brand. The company has worked on devices, but none of them have come to light. Fitbit has tons of experience pumping out hardware for millions of people. On both the software and hardware fronts, Fitbit has a lot to offer Google.

Of course, acquisitions shouldn’t necessarily be celebrated. Fitbit was a major player in the wearable market that wasn’t tied to one of the big tech companies. Now Apple and Google, the two big names in tech, own the most popular fitness platforms. Fitbit says it’s “health and wellness data will not be used for Google ads,” but naturally people will still be concerned.

If you’re only interested in Google products getting better, this is likely a good step for Wear OS and any Google-made wearable that comes down the line. Google has struggled immensely in this market and Fitbit could be a huge help. Only time will tell.


Source: Google, Fitbit

The post Google officially acquires Fitbit for $2.1 billion appeared first on xda-developers.


from xda-developers https://ift.tt/2PzZ5Yq
via IFTTT

We’re sending the Xiaomi Redmi Note 8 Pro to custom ROM and kernel developers

We here at XDA-Developers have collaborated with OEMs in the past in order to kickstart development for a lot of devices. For instance, our initiative with Xiaomi for the Poco F1 has led to a thriving community that has given Poco F1 users a lot of options in terms of aftermarket ROMs, kernels and other modifications. The ASUS ZenFone 6 also witnesses an active development community thanks to previous device seeding efforts. The same story exists for the Realme X too, thanks to the developer program for the device. Now, we aim to repeat the same story with the Xiaomi Redmi Note 8 Pro, Xiaomi’s latest mid-range value offering.

The Xiaomi Redmi Note 8 Pro was launched in China in late August 2019, confirming all aspects of the device, especially the MediaTek Helio G90T SoC. The Redmi Note 8 Pro made its way to Europe and India with the same SoC, bearing testimony to the confidence Xiaomi had on this chipset. The device showcased great potential in our first impressions, as it sprinted through maxed-out gaming sessions with very good efficiency, good heat dissipation, and no signs of thermal throttling — all of which is impressive considering the price of the device. Xiaomi is marketing the phone as a budget gaming device, and with what we have experienced, we can’t help but agree.

All of this translates into a prediction of another excellent run for the Redmi Note 8 Pro and for the Redmi Note lineup. We expect the phone to sell very well, mainly because there isn’t much that the average consumer would find faults with on this phone — it does tick all of their boxes, after all. What it doesn’t tick boxes for us, the not-so-average consumers, is the fact that historically speaking, MediaTek devices have lagged behind in development against their Qualcomm counterparts. The reason for this is an interplay between factors such as the existence of the Qualcomm CodeAurora forums, the friction and disinterest from ODMs to release the kernel sources to OEMs/vendors (who would have then passed it onto the consumers), and the poor reputation MediaTek had gained because of this friction. This has practically resulted in a Snapdragon monopoly when it comes to aftermarket development, with no other SoC company being in a position (or interested) in challenging this monopoly.

The Redmi Note 8 Pro with the MediaTek Helio G90T presents an opportunity that could open up the gates to a flourishing community outside of Qualcomm. The phone will see a lot of interest from users looking to try out custom ROMs and kernels, but who may be unable to do so because of lack of developer interest. Xiaomi has already released the kernel sources for this device, so we have at least begun walking on this path.

To ensure that there are more options along this way, Xiaomi is sending us 10 units of the Redmi Note 8 Pro, to be used for the greater good of the community. Consequently, these units are being sent out to the following developers:

Individuals in the list above who are based in India have already received the Redmi Note 8 Pro, while those who are based outside of India shall be receiving their devices in the near future. With physical devices in their hands, these developers will be in a better position to contribute to projects that help extend the life of the product and offer more choice to end-users, especially in the ROM enthusiast community. These talented individuals will play a big part in opening up the MediaTek SoC to be a feasible alternative to Qualcomm Snapdragon SoCs within the context of device dev support.

Xiaomi Redmi Note 8 Pro XDA Forums || Buy Redmi Note 8 Pro from Amazon.in

The post We’re sending the Xiaomi Redmi Note 8 Pro to custom ROM and kernel developers appeared first on xda-developers.


from xda-developers https://ift.tt/2pkWOWB
via IFTTT

All updates to existing Play Store apps must now target Android 9 Pie

Back in late 2017, Google made a bold decision: force Android app developers to target newer API levels by adding new Play Store requirements. Google’s goals are to improve ecosystem security (by making sure apps abide by all privacy and permission-related platform changes) and encourage the adoption of new APIs (so users can enjoy new features on their phones.) On August 1st of each year, Google requires that all new apps submitted to the Play Store target the major API level introduced in the previous year. On November 1st of each year, Google extends this requirement to cover updates to existing apps. Thus, as of August 1st, 2019, all new Android apps uploaded to Google Play must target API level 28, or Android 9 Pie. Starting today, that same requirement now applies to app updates.

According to Google, Android 9 Pie was running on 22.6% of all Google Play certified devices in late August of this year. With the certification window for new Android 9 devices closing on January 31, 2020, the percentage of devices running API level 28 or higher is bound to get even bigger. With features like Adaptive Battery in Android 9 and Scoped Storage in Android 10, you’ll want to make sure that your existing app continues to work as intended, at the very least. Personally, I hope the new requirement pushes developers using the older FingerprintManager API to adopt BiometricPrompt so Pixel 4 owners can enjoy Face Unlock in all their apps.

There are a ton of new APIs and tweaks to existing APIs in both Android 9 and Android 10, so you may even be able to create an innovative new app or enhance an existing feature once you take a look through the documentation. Unfortunately, this requirement will likely lead to a few developers abandoning the development of their apps, as we saw when the API level requirement was incremented last year. You can’t really blame Google here as they not only gave plenty of time for developers to update their apps but they also have a valid reason to force developers to target newer API levels.

The post All updates to existing Play Store apps must now target Android 9 Pie appeared first on xda-developers.


from xda-developers https://ift.tt/2PN4kV5
via IFTTT

Chrome 79 Beta brings over VR to the web, Adaptive Icons for installed PWAs, and more

Chrome is the world’s most popular browser, enjoying a market share of about 65% as of September 2019. The second position goes to Safari with a 16% market share, so one can see how wide the disparity really is in terms of user preference and choice. Google Chrome gets updated regularly, with features like Site Isolation, Alt-text auto-generation, ability to send tabs and numbers to different devices, and possibly upcoming features like Game Hub. Everyone’s favorite browser is all set to gain more functionality in the future as the newest Chrome 79 Beta is bringing over improved VR experiences to the web with the new WebXR Device API. For Android, this release extends the adaptive icon functionality for installed Progressive Web Apps.

Chrome 79 Beta ships with the new WebXR Device API enabled by default, an API that provides the interfaces necessary to enable developers to build compelling, comfortable, and safe immersive applications on the web across a wide variety of hardware form factors. This will allow developers to create immersive experiences for smartphones and head-mounted displays. The GamePad API is also being updated to extend the advanced use of controllers to VR. This launch sets the foundation for more immersive features to come, such as supporting augmented reality (AR), tools, and expanding the real-world understanding of immersive experiences. Other browsers will also be supporting these specs soon, including Firefox Reality and Oculus Browser.

This Beta release also brings over Android Oreo‘s adaptive icon support to Progressive Web App (PWAs). Now with Chrome 79 on Android Oreo and later, the system will automatically mask irregularly shaped icons to a uniform appearance. This should bridge the aesthetic difference between installed apps and progressive web apps on your homescreen, and should be especially handy if you have a fair few of them installed.

These, and more changes, are coming over to the Chrome beta release channel for Android, Chrome OS, Linux, macOS, and Windows.


Source: Chromium Blog

The post Chrome 79 Beta brings over VR to the web, Adaptive Icons for installed PWAs, and more appeared first on xda-developers.


from xda-developers https://ift.tt/2NIzIkX
via IFTTT