LightBlog

jeudi 14 novembre 2019

Google is rolling out RCS/Chat in Messages for all US users regardless of carrier

Earlier this year, Google surprised people by bypassing carriers and enabling RCS for users in the UK. At that time, Google said they would love to do the same in the US, but they had to work with carriers. Still, people wondered why they couldn’t just bypass the carriers altogether as they did in the UK. Google is finally doing exactly that.

It’s been a long road for Google’s push to use RCS as its main messaging platform. Back in April of 2018, the company paused work on Allo in favor of the “Chat” RCS-based messaging standard. “Chat” lives inside Google’s Messages app and it’s used when both parties have RCS enabled. It brings typing indicators, larger group chats, larger file transfers, chat over Wi-Fi, and more. Starting today, Chat/RCS works in the Messages app regardless of your carrier.

There were signs of this happening a few weeks ago when people discovered a way to enable RCS in the Messages app for any carrier. The four major US carriers recently announced their plans to support RCS with a new app, but Google was suspiciously not mentioned. So now Google is taking matters into its own hands.

All you’ll need to use RCS in the US is the Messages app from Google. In the next few weeks, you’ll see a prompt in the app asking if you’d like to enable “Chat” features. Alternatively, you can go into the Settings and look for “Chat features.” You can tell if a conversation is using RCS by the “Chat message” text in the edit box. Google says they expect this service to be broadly available in the US by the end of the year.

Messages (Free, Google Play) →


Source: Google

The post Google is rolling out RCS/Chat in Messages for all US users regardless of carrier appeared first on xda-developers.


from xda-developers https://ift.tt/2Ogbw9J
via IFTTT

Samsung Galaxy Tab S6 Review: The Best Tablet Android has to Offer?

While Android tablets seem stagnant compared to Apple’s tablets, Samsung’s Galaxy Tab S6 may just be the only good tablet that can compete with the iPad. Priced starting at ₹59,999 (~$847), the Galaxy Tab S6 offers top-of-the-line specifications that compete directly with the iPad Pro. With the optional keyboard folio case, the Tab S6 aims to be the laptop replacement that some of you are looking for. However, many tablets before the Tab S6 have tried this strategy with little success. So, is the Galaxy Tab S6 any different? We’ll take a look at this question in our review of the LTE variant of the Galaxy Tab S6.

Samsung Galaxy Tab S6 Forums

Samsung Galaxy Tab S6 back


Specifications

Specification Samsung Galaxy Tab S6
Dimensions and Weight
  • 244.5 x 159.5 x 5.7 mm
  • 420g
Display
  • 10.5″ sAMOLED
  • WQXGA (2560 x 1600)
  • 16:10 aspect ratio
  • 287ppi
SoC Qualcomm Snapdragon 855;
Adreno 640
RAM and Storage
  • 6GB + 128GB
  • 8GB +256GB

Expandable up to 1TB via dedicated microSD card slot

Battery 7,040 mAh
USB USB Type-C
Rear Camera
  • 13MP, f/2.0
  • 5MP, f/2.2 ultrawide
Front Camera 8MP, f/2.0
Android Version One UI based on Android 9 Pie

About this review: This unit of the Samsung Galaxy Tab S6 was loaned to us by Samsung India.


Design

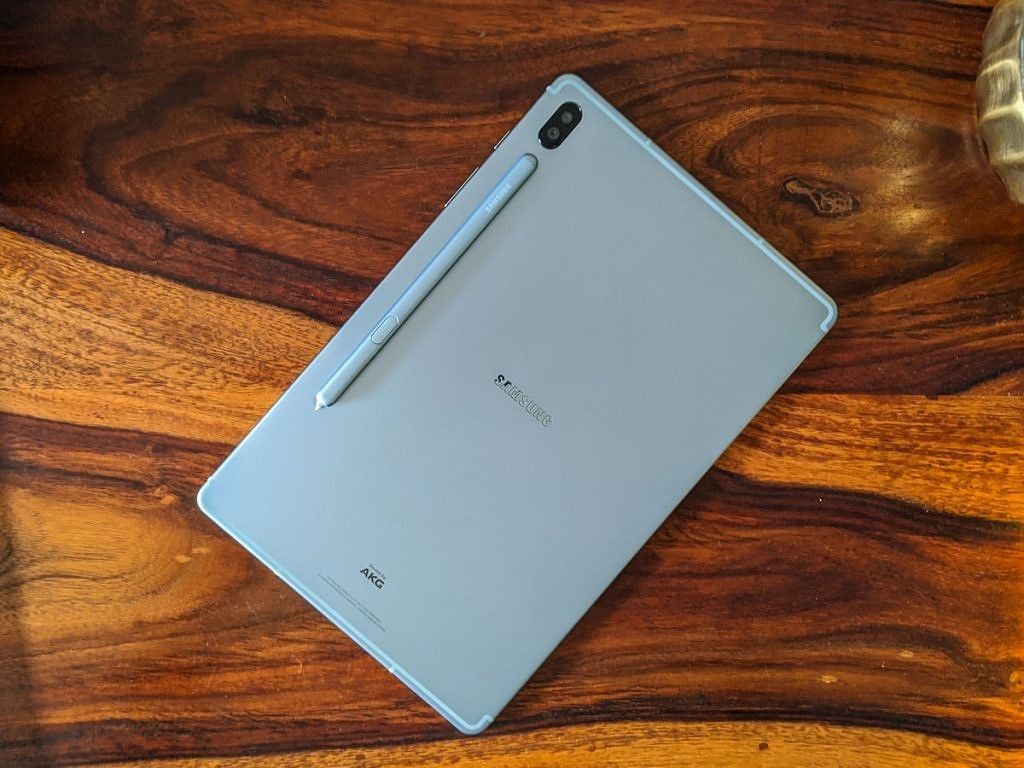
The Galaxy Tab S6 features a sleek, unibody metal design befitting a tablet in this price range. It has a metal backplate with the Samsung logo in the center and a thin indent right below the dual camera module to house the included S Pen.

Samsung Galaxy Tab S6 back

On the front, the tablet has a 10.5-inch Super AMOLED display at a resolution of 2560 x 1600 and thick bezels on all sides. At first glance, I didn’t like the chunky bezels, but I soon realized that they were there for a reason: They help you hold the tablet without accidentally touching the display, something that would be difficult to achieve if it had slimmer bezels. For the same reason, most other tablets in the market also have relatively thick bezels. But much like the iPad Pro, the ones on the Galaxy Tab S6 are comparatively slimmer than the rest.

Samsung Galaxy Tab S6 front

The power and volume buttons can be found on the right (or top, depending on how you’re holding it) edge of the tablet. On the opposite end, the tablet has a proprietary magnetic connector to help you easily clip on the keyboard folio case without any hassle. Towards the bottom, the tablet features a USB Type-C port for charging and data which is flanked by speaker grills on both sides.

Samsung Galaxy Tab S6 side 1

There are two more speaker grills on the opposite end for a total of four speakers. That’s nice to have, but on the other hand, there’s no 3.5mm headphone jack. On the LTE version, you’ll also find the SIM card tray on the same side as the power button, and it features a microSD card slot for expansion up to 1TB.

Samsung Galaxy Tab S6 side 2

The Galaxy Tab S6 is incredibly thin—measuring in at just 5.7mm—and it weighs just 420g so it’s a pleasure to use. Adding on the keyboard folio case does make the tablet a bit chunky, but that’s a sacrifice you’ll have to make if you want more productivity out of your Tab S6.

The keyboard folio case comes in two parts with a back cover that adheres to the tablet using a reusable sticky pad. The back cover has a hinge running down the middle, which allows you to fold the bottom half to use it as a kickstand. The back cover also has a small flap at the top that has room to accommodate the S Pen while it’s charging on the back of the tablet. The other half of the folio has the keyboard that attaches magnetically to the proprietary connector on the tablet. The keyboard is surprisingly quite rigid, making for a decent typing experience while using it on a desk. However, when I used it on an uneven surface, like on my lap, the entire setup wobbled a lot and I was concerned that it would fall—this isn’t new to the form factor, but it’s an issue the Tab S6 fails to rectify.


Display & Audio

The 10.5-inch display on the Galaxy Tab S6 has a wide 16:10 aspect ratio at a 2560 x 1600 resolution. This translates to a pixel density of about 287ppi, resulting in crisp visuals. The Tab S6 makes use of an AMOLED panel, which is still quite rare in the tablet market, giving it an edge over the iPad’s Liquid Retina IPS LCD. The quality of the panel is fantastic—much like other AMOLED displays from Samsung—and it’s great for media consumption with its deep blacks and punchy colors. Sadly, the display is capped at 60Hz, which pales in comparison to the 120Hz display on the iPad Pro. The panel also gets sufficiently bright, so it’s easy to use outdoors on a bright, sunny day. On top of that, it features HDR10+ support, so if you watch HDR movies on the Tab S6, you’re going to have a great experience.

Samsung Galaxy Tab S6 side display

I watched a 4K HDR stream of Spider-Man: Into the Spider-Verse on it, and it looked superb. Indeed, in terms of quality, this is likely one of the better consumer device panels that money can buy. The quad-speaker setup added to the experience, offering great stereo separation and crisp audio quality, even at maximum volume. The tablet can get surprisingly loud, easily beating the dual-speaker plus sub-woofer setup on my Dell Inspiron 7567. Even with a dedicated sub-woofer, my laptop couldn’t match the Tab S6’s low-end performance. By this point, I was already convinced that the Tab S6 is the perfect buy for someone who just wants a tablet to watch movies or TV shows.


Performance

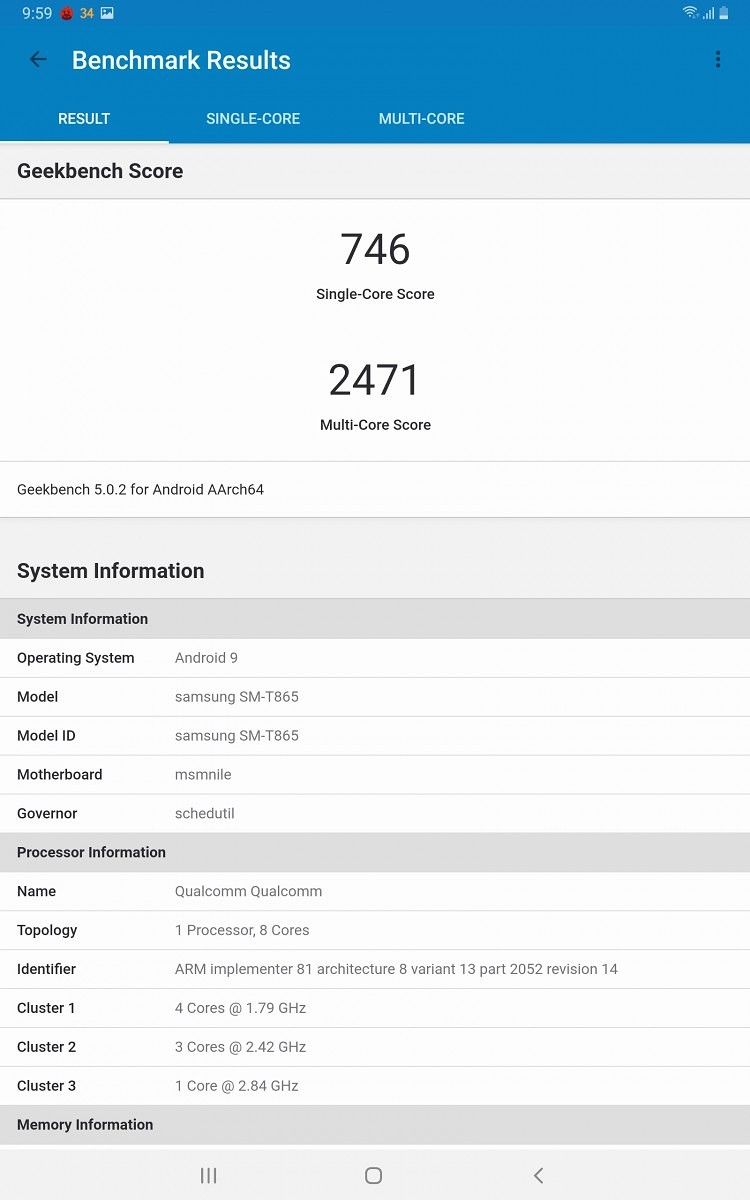
Thanks to its flagship specifications, you can do a whole lot more than just consume media with the Galaxy Tab S6. The tablet features the Qualcomm Snapdragon 855 chipset, and my review units came coupled with 6GB of RAM and 128GB of internal storage. With these specifications, the tablet breezed through everything I threw at it, including multitasking and gaming. Benchmark results were also consistent with what you’d expect from such hardware. Of note, however, was the fact that I didn’t have a particularly great experience playing games on it because of the large form factor.

Samsung Galaxy Tab S6 benchmarks Samsung Galaxy Tab S6 benchmarks

The Galaxy Tab S6 managed to score 431,300 in AnTuTu 3DBench, 746 in Geekbench’s single-core test, and 2471 in the multi-core test. In 3DMark Sling Shot Extreme, the Tab S6 scored 5523 in the OpenGL test and 4832 in the Vulkan test. These results fall in line with other Snapdragon 855 devices, as expected, which means you are sure to get excellent gaming performance from this device. The real-world performance matched my expectations of a powerful Snapdragon 855 device as I faced no issues whatsoever playing games like PUBG Mobile or Shadowgun Legends or opening multiple tabs in Chrome with multiple background apps running. This changed as soon as I jumped into Samsung’s DeX mode, though.


Keyboard and Samsung DeX

In my experience, the DeX mode felt half-baked and a few apps didn’t transition well to the desktop experience. Most productivity apps like Microsoft’s Office suite work quite well, so you can easily get some work done on the tablet. But some apps like Instagram and Autodesk Sketchbook don’t scale well in DeX mode. Samsung does give you the option to force apps to resize in DeX mode, but that option doesn’t work with all apps. And there are other problems, too.

Websites opened in Chrome don’t load up as the desktop versions of the sites by default, so you’ll have to turn on the desktop user-agent option for each individual website. Another issue I faced while using Chrome was that if I tried to edit Google Docs in the browser, the Tab S6 kept prompting me to use the Android app instead of letting me edit the document in the browser like I would on a laptop. This problem persisted across all GSuite apps. DeX mode also doesn’t let you split browser tabs to open them in separate windows, which further detracts from the experience. Additionally, switching to DeX mode takes a fair bit of time, and I wish Samsung would do something to make the process a bit faster.

Samsung Galaxy Tab S6 keyboard folio case

On top of all that, DeX mode on the Tab S6 is pretty much useless without a keyboard, and the layout is a pain to use with just the touchscreen. This means that if you’re planning on using the tablet as a laptop replacement, you’ll have to invest in the keyboard folio (which is hard to find in some markets like Indian), adding another $180 to the price of the tablet.

Now, let’s talk about the keyboard folio itself. Although I was initially concerned about the durability of the sticky pad on the cover, I ended up facing no issues whatsoever, even after removing and re-applying the cover several times. The keyboard itself is just about okay with some flex and minimal key travel. I had problems adjusting to its compact layout because of my large hands, but I’m sure most of you don’t have gargantuan hands like mine, so that shouldn’t be a problem. The keyboard deck also has a small trackpad that you can use to navigate on the Tab S6, and it also includes support for gestures, which is a welcome addition.


S Pen

While Samsung doesn’t include a keyboard with the Galaxy Tab S6, it does include the new and improved S Pen. The S Pen connects wirelessly over Bluetooth to the tablet for certain features, including air gestures, but I used it mostly for taking notes and doodling. Since I’m not much of an artist, I gave the Tab S6 to my brother for a while to test out the S Pen’s capabilities, and he was quite impressed.

Samsung Galaxy Tab S6 S Pen

The pressure-sensitive tip on the S Pen makes it a great drawing tool, even for professionals, and it can easily replace the Wacom pen tablet you might have lying around. Palm rejection while using the S Pen is also spot on, which greatly improves the note-taking or drawing experience. The S Pen charges wirelessly when attached to the tablet in the indent on the back. However, without the case, it’s quite easy to knock it off its position. With the case, though, the S Pen gets a storage space with its own cover which is definitely a better solution.


Cameras

The Galaxy Tab S6 features a dual-camera setup on the back consisting of a 13MP f/2.0 primary camera and a 5MP f/2.2 ultra-wide camera. On the front, the device has a single 8MP f/2.0 selfie shooter. As you’d expect, the Tab S6 can capture some decent photos from the front and rear cameras, but I doubt they’ll be used all that often. Due to the Tab S6’s size and form factor, taking pictures with it is rather uncomfortable and awkward.

At most, you’d probably use the front camera for video calls, and it serves well for that purpose. Photos taken with the primary camera have accurate color reproduction, decent dynamic range, and a good amount of details. This carries forward to the wide-angle camera as well, but you’ll notice a significant loss in detail.

Standard selfie Wide-angle selfie

The selfie shooter also does a decent job, but the photos aren’t worth writing home about. The Tab S6 definitely applies some sort of smoothening effect to my face, and that’s with the beauty mode turned off which should have taken care of it.


Battery Life

Lastly, let’s talk about battery life. The Galaxy Tab S6 has a massive 7,040mAh battery. In my testing, the tablet never died on me during the day. I typically used it to browse the internet, check my email, and watch videos on YouTube and Netflix. With the brightness set at 30%, the tablet managed to deliver a screen on time of over 7 hours during the day, which primarily consisted of watching videos. And even then, it had about 50 percent battery left to last me another day.

Galaxy Tab S6 Battery Life Galaxy Tab S6 Battery Life

As you can see in the screenshots above, even though I spent close to 8 hours on YouTube and Netflix, the Tab S6 was still left with about 30% charge. In conclusion, no matter what you’re doing on the Tab S6, I’m sure it’ll easily last you a day or maybe even more. However, if you’re planning on playing games on the tablet, you might be able to drain it completely within the day. Thankfully, Samsung packs in a 15W charger in the box which takes about two hours to charge the tablet back up to 100%.


Samsung Galaxy Tab S6: Should you buy it?

Priced at ₹59,999 (~$847), the Samsung Galaxy Tab S6 is a great buy for artists or people looking for a portable media device. Sure, it may seem a bit too expensive for that purpose, but that’s the premium you’ll have to pay if you want a flagship Android tablet. The price is still lower than that of the WiFi-only iPad Pro base-variant which is priced at ₹68,305 (~$947). With the Tab S6, you get an impressive AMOLED display, a powerful quad-speaker setup, the S Pen, expandable storage, and LTE support. But it’s not just the hardware that differentiates the two devices. The Galaxy Tab S6 lags behind on the software front, with iPadOS offering a significantly better selection of tablets apps and polished functionality that better bridges the gap between laptop and tablet.

If you’re planning on getting the Samsung Galaxy Tab S6 as a laptop replacement, you’ll need to purchase the optional keyboard folio case which isn’t all that cheap. But then again, it’s much cheaper than the smart keyboard folio from Apple, so that’s another point in favor of Samsung. You could, however, go with the Microsoft Surface Pro 6 with Windows 10 if you’re looking for the best laptop replacement out there. But that, too, is much more expensive than the Galaxy Tab S6 as it comes in at ₹71,890(~$997) without the type cover and the Surface Pen. All-in-all, the Galaxy Tab S6 is a great Android tablet for someone looking for flagship performance, great media consumption prospects, and light productivity, provided they’re fine with a couple of compromises. It would be a stretch to say the tablet is affordable, but when compared to the iPad Pro and the Surface Pro 6, it’s at least competitive if you can look past the modern Android tablet’s biggest downside… which is Android itself.

Buy the Samsung Galaxy Tab S6 from Amazon India


Disclosure: We use a plug-in that automatically generates affiliate links.

The post Samsung Galaxy Tab S6 Review: The Best Tablet Android has to Offer? appeared first on xda-developers.


from xda-developers https://ift.tt/2QisCGD
via IFTTT

OnePlus 7T Pro Development Update: Unbrick Tool, Magisk Installer, and Custom Kernels

Over the last couple of years, OnePlus has established itself as a premium smartphone brand worldwide. The company offers great flagship smartphones at a relatively affordable price point, but that’s not the only reason behind its popularity. The smartphones also offer one of the best software experiences out there and, on top of all that, they’re quite easy to mod. OnePlus has also been receptive to the needs of the developer community, promising timely kernel source releases, among other things. Thanks to this, third-party development for even its latest flagship — the OnePlus 7T Pro — is already on full swing. Here’s everything new that’s currently available for the OnePlus 7T Pro:

OnePlus 7T Pro XDA Forums

Unbrick tool

Much like older devices from the company, the OnePlus 7T Pro has now also received an unbrick tool that will allow you to restore your device in case you accidentally brick it. The tool can also be used to roll back to a previous version of OxygenOS, which can really come in handy if an update is plagued with critical bugs. The tool is quite easy to use and you can download it on your PC from the link below.

Unbrick tool for OnePlus 7T Pro

Magisk installer

In case you’re planning on rooting your OnePlus 7T Pro, you’d be glad to know that developers have also released the Magisk installer for the device. You can download it from the forum post linked below and follow the instructions in the post to easily install Magisk on your device. Do note that you’ll first have to unlock your device before you can go ahead with the installation.

Magisk installer for OnePlus 7T Pro

blu_spark custom kernel

Once you have Magisk up and running on your 7T Pro, you can also try flashing the blu_spark custom kernel on your device. The kernel features all the goodies available with the kernel on the OnePlus 7/7Pro. It can help you significantly improve your device’s performance and unlock new features like tunable vibration strength, gesture haptic feedback control, and more. Download the blu_spark custom kernel from the forum post linked below.

blu_spark custom kernel for the OnePlus 7T Pro

Along with the aforementioned releases, Franco kernel’s developer Francisco Franco and Arter97 Kernel’s developer arter97 have also received the OnePlus 7T Pro from the company. This means that their custom kernels should be available for the device sometime soon. It’s worth noting that because of changes made in Android 10 for newly launched devices, TWRP custom recovery hasn’t been released for the 7T Pro. It will be a while before the recovery is ported to the device.

Buy the OnePlus 7T Pro from Amazon India

The post OnePlus 7T Pro Development Update: Unbrick Tool, Magisk Installer, and Custom Kernels appeared first on xda-developers.


from xda-developers https://ift.tt/2OfEarm
via IFTTT

1Gallery: A Beautiful Photo Gallery App That Supports Hidden Pictures

After two years of releasing the Today Weather application, XDA member thotran7989 has now launched another very exciting app, 1Gallery

1Gallery aims to be the best alternative gallery app designed for managing your photos. The feature rich app allows you to secure your photos and videos via hidden folders and encryption features.

1Gallery was developed with three basic things in mind: 

  • Simple & Beautiful: Like Today Weather, design of 1Gallery is quite simple and focuses on being as user-friendly as possible. The app also has support for Dark/Light/Auto theme.
  • Smooth Performance: Apart from a beautiful user interface, 1Gallery offers a very smooth and consistent UI that doesn’t lag when you’re flipping through your photos and videos.
  • Security: There are many situation where you’ll want to keep certain photos and video hidden. Often times we will lend our phone to another person, or in worse situations, have our phones stolen. 1Gallery’s Secure Album feature will make sure that photos stored in this section will never be seen by unwelcome eyes. This section of the gallery is encrypted and will require a password to view any of its contents.


Some key features:

  • Hide photos and videos. The hidden files are all ENCRYPTED.
  • Password mode: Pin, Pattern, Fingerprint.
  • Organize your photos/videos.
  • View huge images and many different photos and videos types (RAW, etc).
  • Management: Search, create new folders, move/copy data and more (Memory card supported).
  • Photo editor: Crop, rotate, resize, filters & more.
  • View videos with subtitles.
  • View detailed information of your files (resolution, EXIF values etc).
  • Themes: Auto, Light, Dark.
Check out the XDA Thread!
 We thank todayweather.co for sponsoring this post and providing the content. Our sponsors help us pay for the many costs associated with running XDA, including server costs, full time developers, news writers, and much more. While you might see sponsored content (which will always be labeled as such) alongside Portal content, the Portal team is in no way responsible for these posts. Sponsored content, advertising and XDA Depot are managed by a separate team entirely. XDA will never compromise its journalistic integrity by accepting money to write favorably about a company, or alter our opinions or views in any way. Our opinion cannot be bought.


The post 1Gallery: A Beautiful Photo Gallery App That Supports Hidden Pictures appeared first on xda-developers.


from xda-developers https://ift.tt/2CKQPND
via IFTTT

RIP Menu Button: Android 10 drops legacy support for extremely old apps

A lot of us on this website have been long-time Android users, lurking around since the days of Froyo and Gingerbread. Back then, smartphones came with physical buttons (gasp!) for UI navigation: namely the Back button, the Menu button, the Home button, and the Search button. The physical press buttons made way for capacitive touch buttons, and the Search button was also dropped by some OEMs — but the general idea of navigating through the UI and apps with the other three dedicated buttons persisted across the Android world at that time.

With Android 3.0 Honeycomb, Google pushed for tablet makers to adopt software-based on-screen navigation buttons instead of physical buttons and introduced the ActionBar as the standard solution to make actions from the user options immediately visible and quick to invoke. The idea of the “Menu” button had also evolved into an “Action Overflow” button, indicating a button that retrieves actions that cannot fit in the Action Bar; users still continued to refer to it as the Menu button though. Honeycomb also introduced the Recent Apps button for tablets, while Android 4.0 Ice Cream Sandwich pushed this onto smartphones. The iconic 3-button navigation bar comprising of Back, Home and Recent Apps was thus born, leaving behind the dedicated Menu and Search buttons.

Android Market

Android Market with the Overflow button, along with the 3-button navigation bar

Having a dedicated Menu button led app developers to adopt poor design choices, as developers were rather careless about what actions were shown on the screen and what were in the menu. Back then, users would be subconsciously tapping the menu button, hoping to find more options that would have been useful to them, which was unwanted and wasteful behavior. So the Action Bar was introduced to bring about more design consistency as it advised developers to place most important actions on the Action Bar directly or elsewhere on the screen, and only those actions that did not find a place there would end up in the Overflow button.

However, back then, many apps that targeted Android 2.3 Gingerbread and below had yet to update to show menus on-screen, so users without a dedicated menu button would have had no way to launch the menu. Google addressed this by adding a compatibility behavior for legacy apps that allowed the system to display an action overflow/menu button beside the system navigation buttons on apps that supported only Android 2.3 and lower.

This legacy support has extended all the way from Android 3.0 Honeycomb to Android 9 Pie. But with Android 10, Google has finally pulled the plug. Android apps that target Android 2.3 or earlier will now no longer have a menu button shown on Android 10, and onwards. In response to a bug report that highlighted the removal, Google confirmed the removal:

This was intentionally removed as the API has been deprecated for several releases now. So, this is working as intended.

This decision will affect a very, very small number of users who have continued to rely on ancient and long-abandoned apps — if it works, it works, right? If you are one of those that have suddenly found that one of your long favorite apps no longer is able to show its menu, perhaps it is time to move on and look for newer alternatives.


Source: Google Issue Tracker
Story Via: /r/Android

The post RIP Menu Button: Android 10 drops legacy support for extremely old apps appeared first on xda-developers.


from xda-developers https://ift.tt/2pdZCVc
via IFTTT

Reddit’s official Android app now lets you view subreddit wikis and makes it easier to format links

Android users are spoilt for choice when it comes to third-party Reddit apps on the Play Store. From BaconReader to Boost, there is a variety of different apps to choose from. While third-party apps for Reddit were a necessity a while ago, it all changed when the company released its official app on iOS and Android. Since its release, the Reddit app has undergone several changes. And with each successive update, Reddit adds new features to the app to improve user experience. Most recently, the app received support for Android 10’s dark mode toggle. And now, with the latest update, the app is getting two more handy features.

Update 3.40 of the Reddit app is now rolling out to users worldwide and it brings a couple of noteworthy changes to the way you format links and view subreddit wikis. But before we get to the details, here’s the official changelog for Reddit 3.40:

Reddit 3.40 changelog

Now that we’ve got that out of the way, let’s focus on the new way to format links on the app. Reddit makes use of markdown for formatting, so inserting a link to a specific word or phrase requires you to first add your text in square brackets, which is followed by the link in parenthesis. This could get a bit cumbersome on mobile, so Reddit has now added a button that helps you generate these formatted links.

Link formatting button 1 Link formatting button 2

Furthermore, the update also adds subreddit wikis to the app, which means that you won’t be redirected to the browser if you wish to view the wikis. The subreddit wikis can be found within the Menu tab and tapping on the option opens it up in the app itself.

Subreddit Wikis 1 Subreddit Wikis 2

At the time of writing, the update wasn’t available on my device, however, our Editor-in-Chief Mishaal Rahman has received it already. This leads us to believe that the update is being rolled out in a staged fashion. So in case you haven’t received it already, you should get it in the next few days.

The post Reddit’s official Android app now lets you view subreddit wikis and makes it easier to format links appeared first on xda-developers.


from xda-developers https://ift.tt/2qcou0a
via IFTTT

RAVPower PD Pioneer 20,000mAh Power Bank Review – A Perfect Travel Companion

I’ve been in search of a power bank for a long time now, ever since my trusty Anker PowerCore 20100 started to show signs of aging. Thanks to shipping regulations, it can be difficult to get power banks into Ireland, though, so when I had the opportunity to review the RAVPower PD Pioneer 20,000mAh portable charger, I jumped at the chance. For pretty much anyone else, though, it’s an easy device to pick up: You can buy it from Amazon in the U.S. or RAVPower’s own store on their website.

Specifications

Category Specification
Output 18W
Capacity 20000mAh
Input microUSB, Lightning, USB-C
Output USB-C, 2x USB-A (one iSmart, one Quick Charge 3.0)

Design

The RAVPower PD Pioneer 20,000mAh portable charger has a hard, scratch-resistant surface that will help to keep it looking in pristine condition no matter the conditions that it’s put through. This power bank also has a screen on one side which shows the percentage battery level left, and it can be lit up simply by pressing the power button on the side. On the top, there are three input ports through which it can be charged – a microUSB slot, a USB-C PD slot, and a Lightning Port. I’ve been using the USB-C PD slot to charge it as I find that it’s the fastest way to do so. As it has a 20,000 mAh capacity, it does take a long time to charge – nearly 6 hours, from my testing. Still, 20,000 mAh goes a long way, and you can use it to charge lots of devices thanks to two USB-A ports and a USB-C port too. You’ll need a USB-C to USB-C cable to make use of Power Delivery, but if you do have one, you’ll be able to charge your devices, like Google’s latest Pixels, fairly quickly.

The RAVPower PD Pioneer 20,000mAh portable charger is definitely bulky and a bit heavy, though it’s not a huge deal as it’s something that you’ll typically just toss into your bag and forget about. That’s what I’ve done with it, anyway.

Charging speed and usability

Because this power bank supports USB Power Delivery, it should be capable of fast charging pretty much any USB Type-C compliant device that you own. I found it can charge the Samsung Galaxy A20e, the Huawei P20, the OnePlus 7T Pro, and even the Nintendo Switch quickly – so long as I used a proper USB-C to USB-C cable, anyway. That’s because the Power Delivery port is the USB-C port, which can both charge and discharge the power bank. Sadly, there isn’t much in the way of cables in the box – you only get a USB-A to microUSB cable in the box.

Whatever you’ve come to expect from a Power Delivery Type-C port is exactly what you’ll get here, and it’s a nice luxury to have. It can even charge my MacBook Pro, although obviously it’s not nearly as fast as the 87W charger. It can still help me if I’m in a pinch, though. If I forget to charge my laptop, I can put it in my bag, connect it to my power bank, and leave it to charge in my bag while I go about my day. The ability to do that alone is understated. It’s pretty slow, but the battery of my MacBook didn’t drain when I had it plugged in, which is the most important thing. It did, however, say it would take about 8 hours to charge to full.

As for the charging speed of the power bank itself, it can charge in roughly five and a half hours when charged using a USB PD-compatible charger. That means you can just leave it to charge overnight and have it ready the next morning, which is what I’ve been doing. I generally just top it up a little bit whenever I’m not using it, rather than charging it all in one go every few days.

Price and availability

The RAVPower PD Pioneer 20,000mAh power bank can be difficult to import depending on where you live. Even getting this review unit was difficult as changing transport regulations mean that it could not be sent via air. If you live in the U.S. or mainland Europe, you should be fine, though. Parcel forwarding services may also be an option depending on where you live. For $50 (on Amazon U.S.), though, I think you’ll get your money’s worth. Previously, I used the Anker Powercore 20100, but its lack of versatility became somewhat of a problem as it aged. It couldn’t charge my Nintendo Switch, for starters, and the lack of USB-PD meant that lots of devices would charge rather slowly.

If you’re interested in picking up this particular power bank, you can grab it from either Amazon US or RAVPower’s own website. Check out the links below!

Amazon U.S. | RAVPower’s website

Note: We use plugins that automatically generate affiliate links.

The post RAVPower PD Pioneer 20,000mAh Power Bank Review – A Perfect Travel Companion appeared first on xda-developers.


from xda-developers https://ift.tt/2QoMJDb
via IFTTT